Intro

It’s me again. It looks like it’s been over 3 years since I’ve made a blog post (wow, time flies!). First of all, I’m sorry about that. I don’t know if it’ll make up for it, but this post is one that I’ve wanted to write for quite a while.

Today I want to talk about automating whatever compliance checks you might be required to adhere to for any computers you manage. Depending on what you do and what requirements you have, the title may seem like it’s insanely obvious. If, like me, you’re held to the standards of something like DISA’s STIGs, then this might be a pretty useful post for you (and you might not believe me).

Some Background

If you don’t know what a Security Technical Implementation Guide (STIG) is, don’t worry too much about it. They’re just guides that detail settings and requirements that computers have to adhere to, and there’s different ones for different OSes and applications (they actually apply to more than computers, but we’ll stick to them for today’s discussion). Fully automating them is a hard problem for at least the following reasons:

  • You have to know which ones apply to which systems
  • Some of the checks require documentation, e.g., "Only approved individuals can have administrator access," or "All installed features must be documented with the site."
  • There’s a whole bunch of them, and if/when you think you’ve evaluated all of your systems, most of the STIGs have been updated
  • There’s more, but you probably get the picture

STIGs aren’t anything new to me as a sysadmin, and I’ve always strived to figure out ways to automate applying them and evaluating them. I’ve got some stories that I’d love to tell you about implementation wins (even before I knew what PowerShell was), but implementation is actually pretty simple for the vast majority of the Windows STIG checks now, and the stories would be boring (some of that’s because the OS made improvements, and some are because the STIGs got a little bit better). The harder thing now is finding systems that aren’t implemented properly for whatever reason, e.g., Group Policy is messed up (either server-side, or something’s wrong with the client), something’s wrong with your configuration management client, etc. With thousands of checks per system, how do you know if one systems has slipped through the cracks?

Anyway, a few years ago, I had to provide proof of compliance on a bunch of systems. Like 100% compliance for 100% of the checks for a decent number of systems. In the STIG world, you usually do that with CKL files (these are XML checklists that are used with DISA’s StigViewer utility). I also became aware of the fact that this was going to be the new normal for all of the systems I managed.

If you’re familiar with STIGs, then you’re also familiar with SCAP (Security Content Automation Protocol). The problem is that SCAP isn’t capable of 100% STIG evaluation (at least not to my knowledge). It is pretty cool, and part of a complete compliance solution, though. The way it works is you get SCAP content, which are like definitions for different STIGs (STIGs use something called XCCDF to define those), and you feed those to a SCAP compliance validation program. The validation program knows how to read the SCAP content, and how to enumerate and evaluate against different clients. There are tons of SCAP validation programs out there, including stand-alone programs and components of larger programs that can tie in with larger configuration and/or vulnerability management solutions. The output generated by the validation program can be used to give you nice reports if you’re using something like Nessus or SCCM, or you can take the raw files and convert them into the CKL format.

SCAP wasn’t going to be enough, so over the course of a few months, after a mix of some good and bad decisions, a design for automating everything sort of took shape, and a PowerShell module called StigTester was born (pretty original name, huh?).

StigTester

The path to StigTester had a decent number of turns and false starts, but the way it exists in its current form really took shape about three years ago.

I know there are other automation solutions out there, but I’m not sure any of them go as far as StigTester (if there is such a solution that’s out there, please let me know so I can correct this section). The unique thing about it (I think) is the way it’s split into different components:

  • The engine
  • The STIG repository
  • The test repository
    • Applicability tests
    • Test environments
    • Check tests
  • The documentation repository
  • Other utilities and tools

It being split up that way makes it much tougher to explain exactly how it works, but I promise, it makes it capable of succeeding where other solutions have failed (here I’m talking about my other failed automation endeavors, not others out there that may very well work better than what I’m going to describe). The structure is actually the magic here, and if you understand that part, you can go make a version that’s definitely way better than StigTester is today in whatever language you like.

Instead of boring you with design details from the start, let me just walk you through what setting up, running, and maintaining StigTester looks like for a single system, and take a shallow peek under the surface for each of those views. I usually dive too deep when explaining stuff like this, and it doesn’t help anybody 🙂

Setup

Let’s imagine you’re starting your own StigTester distribution. To do that, you’d start with the module files, but with no entries in any of the three repositories (stick with me here). Running an evaluation on a system wouldn’t do anything, because the repos are empty.

Let’s say you want to implement the Windows 10 STIG (I don’t know the current version/release, but let’s say V1R10 is the current one for our example). You’d go to DISA’s site and get the latest XCCDF STIG file and copy it into the STIG repository.

Having the STIG in the STIG Repository is a start, but you have to have something in the Test Repository for any CKLs to be generated during an evaluation phase. The structure of the repo isn’t important, because you interface with it via a helper command called New-StigTesterDefinitionScript:

PS> New-StigTesterDefinitionScript "Windows 10"

# Tab completion kicked in for that command :)

That makes a template that’s ready to be run to inject all of your tests into the test repo (if you run it at this point, it won’t do anything). You open it up in your editor of choice, and you fill in at least the first entry, which is the applicability test. That’s where you put the code snippet that will return $true if the STIG is applicable, so it’ll look something like this:


New-StigTesterTestRepoItem -Id d587384ab01ff13d3bf25ba9c299a0c0cde5a6e3 -Type ApplicabilityTest {
    $CS = Get-CimInstance Win32_ComputerSystem
    $OS = Get-CimInstance Win32_OperatingSystem

    $CS.DomainRole -in 0, 1 -and $OS.Version -match '^10\.'
}


If you fill that part of your template in, then run it, then you’ll actually see some action when you try to generate CKLs during an evaluation phase. Any Windows 10 system you evaluate would generate CKL files that have all of the checks set to ‘Not Reviewed’. That might not seem like much, but if you can grab all of those files (there’s nothing stopping you from having StigTester write its results to a network share so you already have everything together), then you can actually use some other helper utilities in the module to parse the CKLs and create an applicability matrix (NOTE: Don’t use StigTester just to make an applicability matrix–keep going and write some tests)

We’re not going to cover it in this example, but you might want to create a test environment to hold any functions that other tests may use. A couple of scenarios that jump to my head:

  • Firefox (at least in the past) wanted to know about plugins and file open actions, and some of that requires you to look into the profiles on the system. Your Firefox STIG shared environment might go ahead and enumerate all of the profiles so that your tests can run faster without having to do that expensive operation multiple times. You’d probably want to go ahead and write some helper functions that know how to read the profiles and get whatever info you need out of them that the tests can use.
  • The .NET Framework has a handful of checks that want you to look through the whole computer for certain types of files. You could make a shared environment for the STIG that looks through the computer for these special files once, stores the locations, and then have the tests look there.

There is a common shared environment that all of the STIGs have access to that has some of the most common types of checks you might encounter.

Back to our example: now you get the unpleasant task of going through your template and filling out tests. This sounds worse than it is for the vast majority of checks, though (and rest assured that even for really nasty checks, you only have to write the test once, and then you reap infinite rewards). That might look something like this:


New-StigTesterTestRepoItem -Id abcd384ab01ff13d3bf25ba9c299a0c0cde5a6e3 -Type Check {
    
    
    # Assume this is a registry check
    $Params @{
        Path = 'HKLM:\SOFTWARE\Policies\Microsoft\Windows NT\SomeFeature'
        Name = 'Enabled'
        ValueType = 'DWORD'
        ExpectedValue = 1
    }

    Assert-RegistryValue @Params
}

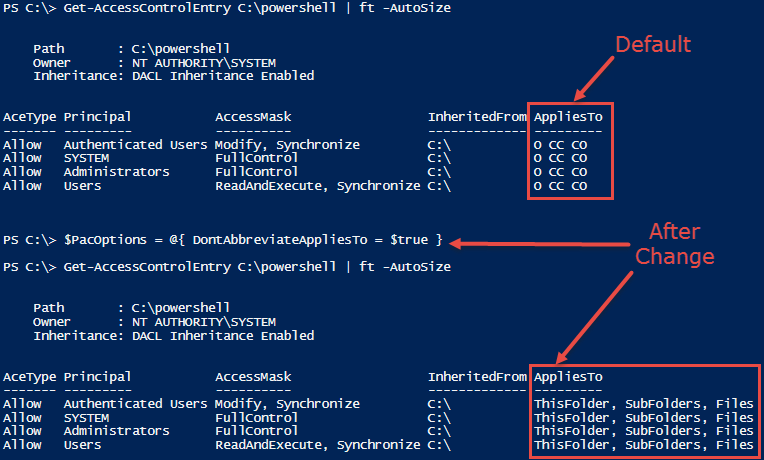
New-StigTesterTestRepoItem -Id ef12384ab01ff13d3bf25ba9c299a0c0cde5a6e3 -Type Check {
    
    
    # Assume this is a permission check
    Assert-Acl "$($env:SystemDrive)\" -AllowedAccess "
        'CREATOR OWNER' FullControl CC, CO
        Administrators, SYSTEM FullControl O, CC, CO
        Users ReadAndExecute O, CC, CO
        Users CreateDirectories O, CC
        Users CreateFiles CC
    "

    # NOTE: Assert-Acl is a powerhouse command. Internally, it's using Test-Acl, which you can see here: https://github.com/rohnedwards/TestAcl
    # You should see that thing rip through AD object permissions for other STIGs :)
}

New-StigTesterTestRepoItem -Id 3456384ab01ff13d3bf25ba9c299a0c0cde5a6e3 -Type Check {
    
    
    # Assume this is a process migitgation check (if you've ever tried to
    # do one of these manually, you'll know how awesome this is)

    # Take note of how you can put logic in to switch the check to N/A. You
    # can set any status like this
    $MinimumReleaseId = 1709
    if ($Win10ReleaseId -lt $MinimumReleaseId) { # This was defined in the shared environment
        Set-VulnTestStatus -Status Not_Applicable -Comments "Only applicable to ${MinimumReleaseId} and greater; current release ID is ${Win10ReleaseId}
        return
    }

    Assert-ProcessMitigation -ProcessName wmplayer.exe -MitigationsToCheck @{
        Dep = @{ Enable = 'ON' }
        Payload = @{
            EnableRopStackPivot = 'ON'
            EnableRopCallerCheck = 'ON'
            EnableRopSimExec = 'ON'
        }
    }
}


Notice the use of lots of helper commands. We’re not going to cover test writing best practices, but just know that doing it that way makes it way easier to change the detailed information written out to the CKL files. And believe me, it’s there. Want to know why that check passed or failed? It will be in your CKL comments, letting you know everywhere that was checked and why the assertion passed or failed.

Anyway, you, test creator/maintainer, went through and answered all of template sections you could, and then ran the template file to populate the test repository. Hopefully you’ve got your repos in some sort of source control, so it’s time to go ahead and commit your changes (the repos are all text at this point). Don’t worry if you didn’t write tests for everything–those checks will just show up as ‘Not Reviewed’ in your results, and even manual STIG evaluators will leave things for later. 🙂

We’re going to ignore the Documentation Repository for now, as this blog post is already going to be way longer than I wanted.

Evaluation

Let’s recap what was done in our example: the Windows 10 STIG XCCDF file was dropped into the STIG Repository, and then a template script was created so that an applicability test and checks could be added for that STIG into the Test Repository.

On your Windows 10 system that you want to evaluate, run this:

PS> Import-Module StigTester
PS> Invoke-StigTest

At this point, the engine will wake up and start enumerating through the STIG Repository. It will keep track of the latest version of each STIG that’s contained in it, and it will make a call to the test repository to get the applicability test. If you run this on a Windows 10 system, then the test will return $true, and then the engine will get each of the checks from the STIG and see if the Test Repository has a test made.

I didn’t mention this above when you were writing the tests, but the Test Repository keeps track of these tests based on an id generated by the actual ‘Check Content’ of the STIG check (it’s slightly more complicated than that, but just imagine it’s hashing the ‘Check Content’ for now). This will be important in the next section dealing with maintenance.

This is also the part where the Documentation Repository is consulted, too. We didn’t add any documentation, but know that the engine knows a whole lot about the system that’s being evaluated, and the Documentation Repository can contain small bits of information about checks that are scoped to systems based on an infinite number of properties, e.g., the domain, the computername, IP address, OS, etc. Again, documentation will have to wait (it’s insanely awesome, though)

In our example, there’s just the one STIG, but the engine would go through each one and create a CKL file with LOTS and LOTS of details. More than someone manually creating a CKL would ever put down.

Maintenance

That’s great, but what about when the STIGs are updated? No problem at all. Go get the newest XCCDF file, and drop it in the STIG Repository (leave the old one for now)

At this point, if you were to run a new evaluation, you’d get 100% accurate CKL files. Let’s assume you had V1R10 100% implemented, and then you drop V1R12 there (you missed an update–whoops!). When the evaluation occurs, any checks that didn’t change (remember that they’re tracked by their ‘Check Content’) are still in the repo. Any checks that were removed won’t be looked up, so they won’t be in the CKLs, any that stayed the same will be evaluated, and any new or modified ones will show as ‘Not Reviewed’. You might not have 100% of the checks implemented anymore, but you’re also not stuck trying to generate some new definition file from scratch, either.

To update, you do something that should look familiar:

PS> New-StigTesterDefinitionScript "Windows 10" -DontIncludeImplementedChecks

That switch makes it so you only get the checks that aren’t in the Test Repository. And since you left the old XCCDF file in the STIG Repository, your template will also show you extra info for the modified checks that existed in the previous version, along with the old test code (90% of updating STIGs is comparing the ‘Check Content’, seeing some note was added that doesn’t change the nature of the test, and copying/pasting the old test into the template.

Then you commit your changes to your source control and distribute the updated StigTester.

Back to the Design

I don’t know if any of that made sense. If it did, then hopefully you see the benefits of designing it this way:

  • Doing anything that resembles coding can be kept separate from evaluating, so testers don’t have to be comfortable with any scripting at all.
  • The actual engine has the hard core "coding", and it can be kept completely separate from STIG testing and documentation maintenance. This means that a site could just pull engine updates and maintain their own repos. At my site, I actually switched jobs, and StigTester’s engine has been working without modification for about a year, but the repos are being steadily updated.
  • You can pick and choose which repos you want to use. For instance, imagine getting a STIG Repository from an external site, but maintaining your own Test Repository. You don’t have a choice on maintaining your own Documentation Repository, but you might choose to take someone else Test Repository, too.
  • StigTester doesn’t currently do this, but this design allows you to "stack" different repos, too. That’s a different discussion…

It also scales really well, but that’s not due to the design. Automate anything to where you just run a command, and then scalability is almost completely solved for you since it just becomes a matter of "How do I deploy it?", and you should already have a mechanism for that since you’re having to update your software.

Where Do I Get a Copy?

Well, you don’t get a copy of it in it’s current form. So much of it was made on the job, I don’t even want to get into who owns what, and what process it would take to get it released. It could probably be released, but since it was designed on the fly, it’s sort of a mess. The engine hasn’t had any major changes in over a year (it might not have had any changes for almost a year), and even when I was using it daily, I had a whole list of improvements that could be made.

For that reason, I’m planning to revamp it and build it from scratch using some lessons learned. The new version, which I’m thinking of calling ComplianceTester, will (at least in theory) be capable of doing more than just STIG checks, and it’s going to work for Linux, too.

I’ve mostly implemented the code for the STIG Repository already (it’s now called the Guideline Repository). I should be able to throw what I’ve got up to my GitHub page soon.

The Documentation Repository

This really deserves it’s own post. StigTester in it’s current form doesn’t do this justice, but the current implementation is still one of the most useful parts of the whole system. This is the magic piece that can get you to 100% compliance.

If this post made any sense and you’re still interested, let me know, and I’ll dedicate a blog post to the topic.

Conclusion

I guess that’s about it for now. If anyone comes across this, please let me know if you have any questions, suggestions, etc. Does it make sense? Is there any part I should elaborate on (including the Documentation Repository)? Do you have some sort of compliance guide you have to follow that’s not a STIG that I can look at to make sure I’m keeping the new framework extensible and nimble enough to work with it? Would you be interested in helping with ComplianceTester?

Oh, I guess I should provide some metrics on what StigTester was doing when I was using it daily:

  • I could get you about 500,000 checks in less than a day (that’s evaluated, analyzed, and visualized–visualization is a topic for another day)
  • I want to say that the average workstation had something like 1,000-1,200 checks with all of their applicable STIGs, but I could be wrong. We essentially had 100% test coverage for them. We still had a few STIG technologies to implement on servers (we got all the big ones, and the ones we didn’t do were just a matter of not getting to them–I’ve never seen a Windows STIG I didn’t think could be automated)
  • We didn’t talk about this today, but the engine has some tools that’ll let you ingest SCAP results and run it through a fake evaluation phase in order to merge documentation. We did that for some of our non-Windows OSes (yet another example of the Documentation Repository popping up again)
  • We also rigged up a little solution for our network gear to take some non-PowerShell custom compliance evaluation results and run those through the engine’s fake evaluation phase, too. This helped us take custom output and turn them into CKLs, and it also let us use our documentation like on the non-Windows systems that still supported SCAP.

The other day I needed a way to test DACL and SACL entries for some files, registry keys, and Active Directory objects. I needed a way to make sure there wasn’t any extra access being granted to users, to make sure certain principals weren’t granted any access at all, and to be able to ensure that certain access was audited.

If you’ve ever tried to validate that sort of thing, I’m sure you would agree that to do it right is no easy task. Access control in Windows is an incredibly flexible, but complicated, topic.

For my first stab at it, I turned to Get-PacAccessControlEntry, but quickly found the boilerplate code I was copy/pasting for the different checks was huge. So I of course made a simple function to try to reduce the duplicate code. This ended up being terrible because I kept having to tweak the function, and even when it worked how I wanted it to, crafting the inputs was way too ugly, since creating ACE objects requires a lot of text (even if you use New-PacAccessControlEntry), and that makes it hard to read.

Then it hit me: the .NET access control methods are perfect for this scenario. When you call Get-Acl, you get back a very versatile in-memory representation of a security descriptor (SD). The object has a few different methods that allow you to add or remove access or audit rights. Notice I said rights, and not entries. While the methods to modify access control take access control entries (ACEs) as input, they don’t actually take those ACEs and append or remove them from the access control lists (ACLs) on the SD (well, the methods that end with ‘Specific’ do actually just add/remove entries, but the AddAccessRule, AddAuditRule, RemoveAccessRule, RemoveAuditRule don’t). They actually look at the input ACE, then, to steal a Star Trek and DSC term, “make it so”.

This is AMAZING, because, as I said, access control is complicated. ACEs contain all of this information:

  • Principal
  • AccessMask
  • Flags
    • AceType (Allow/Deny access or Audit)
    • Inheritance flags
    • Propagation flags
  • (Optional) Active Directory object information
    • Object ACE type GUID
    • Inherited object ACE type GUID
  • Callback information (The .NET methods don’t actually handle this)

I promise you don’t want to deal with that stuff. Here’s some output from a PS session that hopefully demos what I’m talking about when I say that the methods just take your ACE and make it so:


# Start with a blank SD:
PS C:\> $SD = [System.Security.AccessControl.DirectorySecurity]::new()
PS C:\> $SD.SetSecurityDescriptorSddlForm('D:')

# Add an ACE granting Users Modify rights:
PS C:\> $Ace = [System.Security.AccessControl.FileSystemAccessRule]::new('Users', 'Modify', 'ContainerInherit, ObjectInherit', 'None', 'Allow')
PS C:\> $SD.AddAccessRule($Ace)
PS C:\> $SD | Get-PacAccessControlEntry

    Path       :  (Coerced from .NET DirectorySecurity object)
    Owner      : 
    Inheritance: DACL Inheritance Enabled

AceType Principal AccessMask          AppliesTo
------- --------- ----------          ---------
Allow   Users     Modify, Synchronize  O CC CO  


# Notice that if we add it multiple times, there's no effect on the DACL
PS C:\> $SD.AddAccessRule($Ace)
PS C:\> $SD | Get-PacAccessControlEntry

    Path       :  (Coerced from .NET DirectorySecurity object)
    Owner      : 
    Inheritance: DACL Inheritance Enabled

AceType Principal AccessMask          AppliesTo
------- --------- ----------          ---------
Allow   Users     Modify, Synchronize  O CC CO  


# That applies to a folder, its subfolders, and its subfiles. What if we wanted 
# to remove the ability to delete the folder and subfolders?
PS C:\> $Ace = [System.Security.AccessControl.FileSystemAccessRule]::new('Users', 'Delete', 'ContainerInherit', 'None', 'Allow')
PS C:\> $SD.RemoveAccessRule($Ace)
True

PS C:\> $SD | Get-PacAccessControlEntry

    Path       :  (Coerced from .NET DirectorySecurity object)
    Owner      : 
    Inheritance: DACL Inheritance Enabled

AceType Principal AccessMask                         AppliesTo
------- --------- ----------                         ---------
Allow   Users     Write, ReadAndExecute, Synchronize  O CC CO  
Allow   Users     Delete                                   CO  

Removing access took us from one ACE to two! If you look, you’ll see that there’s one ACE granting Write, ReadAndExecute, and Synchronize to the folder, subfolders, and files, and another granting Delete just to files. It removed the access I wanted, and it took all of the ACE components into account for me.

How does this help with the original problem of validating SDs? I mentioned three scenarios above. Here they are again, and with a way to use the .NET SD concept to handle each one.

  • Required Access: For each required ACE, do this:
    1. Remember the SDDL representation of the SD
    2. Add the ACE’s access to the SD
    3. Check the SDDL against the remembered value. If there’s no change, you know that the ACE was already in the SD. If there is a change, the test failed. If you want to know all ACEs that fail, you could reset the SD with your starting SDDL and repeat.NOTE: It turns out this doesn’t work well when the Inheritance/Propagation flags aren’t the default. The SD’s structure can change sometimes, even keeping the same effective access. Not to worry, though: we’ll be able to fix it so these false negatives don’t happen.
  • Disallowed Access (blacklist): I originally wanted to do something similar to -RequiredAccess, but it ended up being more trouble than it was worth. Instead, I made a helper function to do this for me, and it will eventually be used to fix the problem mentioned above with -RequiredAccess.
  • Allowed Access (whitelist): You can take the list of allowed ACEs and remove each one from the SD representation. If the DACL/SACL is empty after doing that, then you know that only access defined in your allowed ACEs list was specified, so the SD passed the test. This has the added benefit of immediately telling you the access that wasn’t allowed (just look at the ACEs in the DACL/SACL.
    You’d have to make a decision on how to treat Deny ACEs (I’m leaning to ignoring them by default)

I’m skipping lots and lots of details there, like figuring out if the ACEs are for the DACL or SACL, and what to do with Deny DACL ACEs. You also have to fix the fact that inherited ACEs won’t get removed. But it’s a start 🙂

I took those ideas, and came up with TestAcl, which is a module that exports one command: Test-Acl. This test module doesn’t depend on the PAC module, even though I plan on putting every bit of this functionality into the module.

One of the coolest things about it is that you provide the rules in string form. The README on the project page covers the syntax, but here are a few examples:


# Look at the DACL for C:\Windows
PS C:\> Get-PacAccessControlEntry C:\Windows


    Path       : C:\Windows
    Owner      : NT SERVICE\TrustedInstaller
    Inheritance: DACL Inheritance Disabled

AceType Principal                           AccessMask                  AppliesTo
------- ---------                           ----------                  ---------
Allow   CREATOR OWNER                       FullControl                   CC CO  
Allow   SYSTEM                              FullControl                   CC CO  
Allow   SYSTEM                              Modify, Synchronize         O        
Allow   Administrators                      FullControl                   CC CO  
Allow   Administrators                      Modify, Synchronize         O        
Allow   Users                               ReadAndExecute, Synchronize O CC CO  
Allow   NT SERVICE\TrustedInstaller         FullControl                 O CC     
Allow   ALL APPLICATION PACKAGES            ReadAndExecute, Synchronize O CC CO  
Allow   ALL RESTRICTED APPLICATION PACKAGES ReadAndExecute, Synchronize O CC CO  


# Notice the comma separated principals and the wildcards
PS C:\> Test-Acl C:\Windows -AllowedAccess '
    Allow "CREATOR OWNER", SYSTEM, Administrators, "NT SERVICE\TrustedInstaller" FullControl
    Allow * ReadAndExecute
' -DisallowedAccess '
    Allow Everyone FullControl
'

True

# Take out TrustedInstaller and see what happens:
PS C:\> $Results = Test-Acl C:\Windows -AllowedAccess '
    Allow "CREATOR OWNER", SYSTEM, Administrators FullControl
    Allow * ReadAndExecute
' -DisallowedAccess '
    Allow Everyone FullControl
' -Detailed

PS C:\> $Results.Result
False

# Ignore the Format-List properties. A future update will handle string representation.
PS C:\> $Results.ExtraAces | fl AceType, @{N='Principal'; E={$_.SecurityIdentifier.Translate([System.Security.Principal.NTAccount])}}, @{N='Rights'; E={$_.AccessMask -as [System.Security.AccessControl.FileSystemRights]}}


AceType   : AccessAllowed
Principal : NT SERVICE\TrustedInstaller
Rights    : DeleteSubdirectoriesAndFiles, Write, Delete, ChangePermissions, TakeOwnership

# Having to specify O, CC for registry keys is a bug that will be fixed later
PS C:\> Test-Acl HKCU:\SOFTWARE\Subkey -RequiredAccess '
    Audit F Everyone RegistryRights: FullControl O, CC
'

True

You can even provide AD object and inherited object GUIDs for object ACEs (see the README on GitHub). It shouldn’t be too hard to extend the parser to make it so you can do something like this, too:
Allow SELF ActiveDirectoryRights: WriteProperty (Public-Information) O, CC (user)

That way you wouldn’t have to look the GUIDs up. For now, though, you can just add the comma separated GUIDs at the end of the string if you need to work with AD object ACEs.

It’s still definitely a work in progress, but I’d love it if people could test it out and provide some feedback and/or contribute to it.

Introduction

Today I want to talk about a pretty cool way to transform an input parameter of one type into a different type automatically. Of course, PowerShell does this already with all sorts of types for you. If you have a function that takes an [int] as input, you can provide a number as a [string], and the engine will take care of converting, or coercing, the string into the proper type. Another example is [datetime] coercion:

function Test-Coercion {
    [CmdletBinding()]
    param(
        [datetime] $Date
    )

    $Date
}

Besides providing actual [datetime] objects, you can provide a [string] or an [Int64]:

PS C:\> Test-Coercion -Date 3/1/17

Wednesday, March 1, 2017 12:00:00 AM

PS C:\> Test-Coercion -Date 2017-03-01

Wednesday, March 1, 2017 12:00:00 AM

PS C:\> Test-Coercion -Date 636239232000000000

Wednesday, March 1, 2017 12:00:00 AM

Examples of coercion are all over the place, and you could spend lots of time going over all the details, so I don’t want to talk about that. Instead, I want to talk about how you can control this process to either change or extend it for custom functions (or variables).

Let’s look back at Test-Coercion, and how it changed ‘3/1/17’ into ‘March 1, 2017’. That makes perfect sense to me since I’m used to the US format, but some cultures would consider that to be ‘January 3, 2017’. If you pass that string to [datetime]::Parse(), you’ll get a culture-specific result, depending on your active culture (run Get-Culture to see yours). If you cast the string to a [datetime], though, you’ll get ‘March 1, 2017’, no matter what your culture is. What if you wanted to be able to pass a string that’s parsed using your culture’s format, and you didn’t want to change the parameter’s type to [string]?

What if you also wanted to be able to provide some “friendly” text, like ‘Today’, ‘Yesterday’, ‘1 week ago’, etc? You could make the parameter’s type a [string], and handle testing whether or not the user passed a valid string inside your function’s code, but I don’t like that because you’d be on the hook for throwing an error when an invalid string is provided. I would rather have Get-Command and Get-Help show that the parameter is a [datetime], and mention in the command’s documentation that, oh, by the way, you can provide these “friendly” strings in addition to [datetime] objects and strings that get coerced already. That way, if someone doesn’t read the help, but they look at the syntax, they’ll know that the command expects [datetime] objects.

You can handle both of those scenarios by implementing your own special PowerShell class called an ArgumentTransformationAttribute. That might sound complicated, but it actually only takes a few lines of boilerplate code when using PowerShell classes. If you don’t have PSv5+, you can still handle it with C# code, but that’s obviously going to be a little bit more complicated (it’s still not that bad, it just looks worse).

In the examples that follow, we’ll go over how to create your own ArgumentTransformationAttributes using either way, so you should be able to use this for any version of PowerShell (I have no idea if it will work in PSv2 or lower, though).

A Simple ArgumentTransformationAttribute Example

Let’s start by adding a new parameter to Test-Coercion from above that parses strings in a culture-specific way, and that allows a few hard-coded strings that normally wouldn’t be coerced into [datetime] objects. We’ll do that by creating a [SpecialDateTime()] attribute:

class SpecialDateTimeAttribute : System.Management.Automation.ArgumentTransformationAttribute {
    [object] Transform([System.Management.Automation.EngineIntrinsics] $engineIntrinsics, [object] $inputData) {

        $DateTime = [datetime]::Now
        $SpecialStrings = @{
            Now = { Get-Date }
            Today = { (Get-Date).Date }
            Yesterday = { (Get-Date).Date.AddDays(-1) }
        }

        if ($inputData -is [datetime]) {
            # Already [datetime], so send it on
            return $inputData
        }
        elseif ([datetime]::TryParse($inputData, [ref] $DateTime)) {
            # String that can turn into a valid [datetime]
            return $DateTime
        }
        elseif ($inputData -in $SpecialStrings.Keys) {
            return & $SpecialStrings[$inputData]
        }
        else {
            # Send the original input back out, and let PS handle showing the user an error
            return $inputData
        }
    }
}

function Test-Coercion {
    [CmdletBinding()]
    param(
        [SpecialDateTime()]
        [datetime] $Date
    )

    $Date
}

The important parts:

  • You have to extend the ArgumentTransformationAttribute class, which is what putting : System.Management.Automation.ArgumentTransformationAttribute after your class name does
  • You have to implement the Transform() method with the signature you see above. $inputData is the object that was passed in that you have the option of modifying. If you’re using PSv5, you can pretty much ignore the $engineIntrinsics. I’ll talk more about it below, because it is useful for C# implementations.
  • You have to return something. I usually just return the original $inputData if the code doesn’t know what to do with whatever input was provided, which will let the normal parameter binding process handle coercion or erroring out.
  • You need to decorate your parameter with the attribute you created. In the example above, that’s where the [SpecialDateTime()] comes in.

Once you do that, whatever a user passes into the -Date parameter will go through the code in the [SpecialDateTime()] first. Note that you may have to change the order of the parameter attributes in some cases. If I recall correctly, I used to have to put the [datetime] before the transformation attribute, but that doesn’t seem to matter in PSv5+.

Let’s see what happens when we run Test-Coercion now:

PS C:\> Test-Coercion Today

Friday, March 24, 2017 12:00:00 AM

PS C:\> Test-Coercion Yesterday

Thursday, March 23, 2017 12:00:00 AM

PS C:\> & {
    [System.Threading.Thread]::CurrentThread.CurrentCulture = 'en-GB'
    Test-Coercion 3/1
}

03 January 2017 00:00:00

It knows what ‘Today’ and ‘Yesterday’ mean, and when I switch the culture to en-GB, ‘3/1’ is interpreted as ‘January 3rd’.

A Reusable Transformation Attribute (with C#, too)

Creating these transformation attributes doesn’t seem to get a lot of attention. Out of the examples I have seen, all of them are created to do a specific job, and can’t really be reused for something else. PowerShell classes make it so that’s not too bad to handle, but I used to use these when you had to make a C# class, and creating, then testing, special classes wasn’t fun. For that reason, I made a generic one that lets you pass a scriptblock that lets you define how to transform the input while building your param() block:

Add-Type @'
    using System.Collections;    // Needed for IList
    using System.Management.Automation;
    using System.Collections.Generic;
    namespace Test {
        public sealed class TransformScriptAttribute : ArgumentTransformationAttribute {
            string _transformScript;
		    public TransformScriptAttribute(string transformScript) {
                _transformScript = string.Format(@"
                    # Assign $_ variable
                    $_ = $args[0]

                    # The return value of this needs to match the C# return type so no coercion happens
                    $FinalResult = New-Object System.Collections.ObjectModel.Collection[psobject]
                    $ScriptResult = {0}

                    # Add the result and output the collection
                    $FinalResult.Add((,$ScriptResult))
                    $FinalResult", transformScript);
            }

		    public override object Transform(EngineIntrinsics engineIntrinsics, object inputData) {
                var results = engineIntrinsics.InvokeCommand.InvokeScript(
                    _transformScript,
                    true,   // Run in its own scope
                    System.Management.Automation.Runspaces.PipelineResultTypes.None,  // Just return as PSObject collection
                    null,
                    inputData
                );
                if (results.Count > 0) {
                    return results[0].ImmediateBaseObject;
                }
                return inputData;  // No transformation
            }
	    }
    }
'@

# Equivalent PowerShell class version:
class PSTransformScriptAttribute : System.Management.Automation.ArgumentTransformationAttribute {

    PSTransformScriptAttribute([string] $ScriptBlock) {
        $this.ScriptBlock = [scriptblock]::Create(@"
`$_ = `$args[0]
$ScriptBlock
"@)
    }

    [scriptblock] $ScriptBlock

    [object] Transform([System.Management.Automation.EngineIntrinsics] $engineIntrinsics, [object] $inputData) {
        return & $this.ScriptBlock $inputData
    }
}

The important parts:

  • You need to provide a constructor so a script can be passed to the attribute
  • The C# version needs to use engineIntrinsics to invoke the script. The PowerShell class version doesn’t need this (even though it wouldn’t hurt to use it). To play around with the options for engineIntrinsics, you can use the $ExecutionContext automatic variable that’s available in your PowerShell session.

Those examples don’t do any error checking, so if an exception is thrown inside your script, it’s going to bubble up to the user of your function. You can add error handling to suppress those errors if you’d like.

You can add anything you want to the user-provided script. I automatically assign the $inputData contents to $_ so that you can use $_ in the attribute.

Let’s add some more dummy parameters to Test-Coercion to demo some simple examples of what’s possible with these attributes:

function Test-Coercion {
    [CmdletBinding()]
    param(
        [SpecialDateTime()]
        [datetime] $Date,
        [Test.TransformScript({
            $_ | foreach ToString | foreach ToUpper
        })]
        [string[]] $UpperCaseStrings,
        [PSTransformScript({
            $_ | foreach ToString | foreach ToUpper
        })]
        [string[]] $PsUpperCaseStrings,
        [Test.TransformScript({
            $_ | ConvertTo-Json
        })]
        [string] $JsonRepresentation,
        [PSTransformScript({
            $_ | ConvertTo-Json
        })]
        [string] $PSJsonRepresentation
    )

    $PSBoundParameters
}

And some examples of running it:


PS C:\> Test-Coercion -UpperCaseString some, strings, to, transform -PsUpperCaseStrings more, strings

Key                Value                         
---                -----                         
UpperCaseStrings   {SOME, STRINGS, TO, TRANSFORM}
PsUpperCaseStrings {MORE, STRINGS}               


PS C:\> Test-Coercion -JsonRepresentation @{Key1 = 'Value'; Key2 = 'Value2'}, @{Key3 = 'Value'} -PSJsonRepresentation (dir hklm:\ -ErrorAction SilentlyContinue | select Name, PSChildName) | ft -Wrap

Key                  Value                                                                                                                                                                                                                                       
---                  -----                                                                                                                                                                                                                                       
JsonRepresentation   [                                                                                                                                                                                                                                           
                         {                                                                                                                                                                                                                                       
                             "Key1":  "Value",                                                                                                                                                                                                                   
                             "Key2":  "Value2"                                                                                                                                                                                                                   
                         },                                                                                                                                                                                                                                      
                         {                                                                                                                                                                                                                                       
                             "Key3":  "Value"                                                                                                                                                                                                                    
                         }                                                                                                                                                                                                                                       
                     ]                                                                                                                                                                                                                                           
PSJsonRepresentation [                                                                                                                                                                                                                                           
                         {                                                                                                                                                                                                                                       
                             "Name":  "HKEY_LOCAL_MACHINE\\HARDWARE",                                                                                                                                                                                            
                             "PSChildName":  "HARDWARE"                                                                                                                                                                                                          
                         },                                                                                                                                                                                                                                      
                         {                                                                                                                                                                                                                                       
                             "Name":  "HKEY_LOCAL_MACHINE\\SAM",                                                                                                                                                                                                 
                             "PSChildName":  "SAM"                                                                                                                                                                                                               
                         },                                                                                                                                                                                                                                      
                         {                                                                                                                                                                                                                                       
                             "Name":  "HKEY_LOCAL_MACHINE\\SOFTWARE",                                                                                                                                                                                            
                             "PSChildName":  "SOFTWARE"                                                                                                                                                                                                          
                         },                                                                                                                                                                                                                                      
                         {                                                                                                                                                                                                                                       
                             "Name":  "HKEY_LOCAL_MACHINE\\SYSTEM",                                                                                                                                                                                              
                             "PSChildName":  "SYSTEM"                                                                                                                                                                                                            
                         }                                                                                                                                                                                                                                       
                     ]                                                                                                                                                                                                                                           

A note about scope

While the PowerShell class implementation of the generic script transform attribute above was much simpler to create and easier to follow than the C# version, it seems to have some problems when it comes to executing in the expected scope. Basically, I’ve had issues being able to use private module functions when these attributes are used to decorate public functions exported by a module. The C# version works fine, but the PowerShell version seems to use the wrong scope. That happens even if I use the $EngineIntrinsics value passed into Transform(). I’m hoping to dive a little deeper into this to figure out if this behavior is a bug, or if I’m just doing something wrong and/or misusing the classes (sounds like a potential blog post). For now, though, I’m going to recommend the C# [TransformScript()] version of the generic transform attribute.

Let’s wrap up with a few more self-contained examples.

Example: Friendly DateTime Strings

This is just a more fleshed out version of the first example above, along with an argument completer, all tucked away in a module. The helper function that understands the text can obviously be extended to work with even more types of words/phrases.

$DateTimeMod = New-Module -Name DateTime {
    function Test-DateTimeCompleter {
        param(
            [datetime]
            [Test.TransformScript({
                $_ | DateTimeConverter
            })]
            $DateTime1,
            [datetime[]]
            [Test.TransformScript({
                $_ | DateTimeConverter
            })]
            $DateTime2
        )

        $PSBoundParameters
    }
    Export-ModuleMember -Function Test-DateTimeCompleter

    function DateTimeConverter {

        [CmdletBinding(DefaultParameterSetName='NormalConversion')]
        param(
            [Parameter(ValueFromPipeline, Mandatory, Position=0, ParameterSetName='NormalConversion')]
            [AllowNull()]
            $InputObject,
            [Parameter(Mandatory, ParameterSetName='ArgumentCompleterMode')]
            [AllowEmptyString()]
            [string] $wordToComplete
        )

        begin {
            $RegexInfo = @{
                Intervals = echo Minute, Hour, Day, Week, Month, Year   # Regex would need to be redesigned if one of these can't be made plural with a simple 's' at the end
                Separators = echo \., \s, _
                Adverbs = echo Ago, FromNow
                GenerateRegex = {
                    $Definition = $RegexInfo
                    $Separator = '({0})?' -f ($Definition.Separators -join '|')   # ? makes separators optional
                    $Adverbs = '(?<adverb>{0})' -f ($Definition.Adverbs -join '|')
                    $Intervals = '((?<interval>{0})s?)' -f ($Definition.Intervals -join '|')
                    $Number = '(?<number>-?\d+)'

                    '^{0}{1}{2}{1}{3}$' -f $Number, $Separator, $Intervals, $Adverbs
                }
            }
            $DateTimeStringRegex = & $RegexInfo.GenerateRegex

            $DateTimeStringShortcuts = @{
                Now = { Get-Date }
                Today = { (Get-Date).ToShortDateString() }
                'This Month' = { $Now = Get-Date; Get-Date -Month $Now.Month -Day 1 -Year $Now.Year }
                'Last Month' = { $Now = Get-Date; (Get-Date -Month $Now.Month -Day 1 -Year $Now.Year).AddMonths(-1) }
                'Next Month' = { $Now = Get-Date; (Get-Date -Month $Now.Month -Day 1 -Year $Now.Year).AddMonths(1) }
            }
        }

        process {
            switch ($PSCmdlet.ParameterSetName) {

                NormalConversion {
                    foreach ($DateString in $InputObject) {

                        if ($DateString -as [datetime]) {
                            # No need to do any voodoo if it can already be coerced to a datetime
                            $DateString
                        }
                        elseif ($DateString -match $DateTimeStringRegex) {
                            $Multiplier = 1  # Only changed if 'week' is used
                            switch ($Matches.interval) {
                                <#                                     Allowed intervals: minute, hour, day, week, month, year                                     Of those, only 'week' doesn't have a method, so handle it special. The                                     others can be handled in the default{} case                                 #>

                                week {
                                    $Multiplier = 7
                                    $MethodName = 'AddDays'
                                }

                                default {
                                    $MethodName = "Add${_}s"
                                }

                            }

                            switch ($Matches.adverb) {
                                fromnow {
                                    # No change needed
                                }

                                ago {
                                    # Multiplier needs to be negated
                                    $Multiplier *= -1
                                }
                            }

                            try {
                                (Get-Date).$MethodName.Invoke($Multiplier * $matches.number)
                                continue
                            }
                            catch {
                                Write-Error $_
                                return
                            }
                        }
                        elseif ($DateTimeStringShortcuts.ContainsKey($DateString)) {
                            (& $DateTimeStringShortcuts[$DateString]) -as [datetime]
                            continue
                        }
                        else {
                            # Just return what was originally input; if this is used as an argument transformation, the binder will
                            # throw it's localized error message
                            $DateString
                        }
                    }

                }

                ArgumentCompleterMode {
                    $CompletionResults = New-Object System.Collections.Generic.List[System.Management.Automation.CompletionResult]

                    $DoQuotes = {
                        if ($args[0] -match '\s') {
                            "'{0}'" -f $args[0]
                        }
                        else {
                            $args[0]
                        }
                    }

                    # Check for any shortcut matches:
                    foreach ($Match in ($DateTimeStringShortcuts.Keys -like "*${wordToComplete}*")) {
                        $EvaluatedValue = & $DateTimeStringShortcuts[$Match]
                        $CompletionResults.Add((New-Object System.Management.Automation.CompletionResult (& $DoQuotes $Match), $Match, 'ParameterValue', "$Match [$EvaluatedValue]"))
                    }

                    # Check to see if they've typed anything that could resemble valid friedly text
                    if ($wordToComplete -match "^(-?\d+)(?<separator>$($RegexInfo.Separators -join '|'))?") {

                        $Length = $matches[1]
                        $Separator = " "
                        if ($matches.separator) {
                            $Separator = $matches.separator
                        }

                        $IntervalSuffix = 's'
                        if ($Length -eq '1') {
                            $IntervalSuffix = ''
                        }

                        foreach ($Interval in $RegexInfo.Intervals) {
                            foreach ($Adverb in $RegexInfo.Adverbs) {
                                $Text = "${Length}${Separator}${Interval}${IntervalSuffix}${Separator}${Adverb}"
                                if ($Text -like "*${wordToComplete}*") {
                                    $CompletionResults.Add((New-Object System.Management.Automation.CompletionResult (& $DoQuotes $Text), $Text, 'ParameterValue', $Text))
                                }
                            }
                        }
                    }

                    $CompletionResults
                }

                default {
                    # Shouldn't happen. Just don't return anything...
                }
            }
        }
    }

    Add-Type @'
        using System.Collections;    // Needed for IList
        using System.Management.Automation;
        using System.Collections.Generic;
        namespace Test {
            public sealed class TransformScriptAttribute : ArgumentTransformationAttribute {
                string _transformScript;
                public TransformScriptAttribute(string transformScript) {
                    _transformScript = string.Format(@"
                        # Assign $_ variable
                        $_ = $args[0]

                        # The return value of this needs to match the C# return type so no coercion happens
                        $FinalResult = New-Object System.Collections.ObjectModel.Collection[psobject]
                        $ScriptResult = {0}

                        # Add the result and output the collection
                        $FinalResult.Add((,$ScriptResult))
                        $FinalResult", transformScript);
                }

                public override object Transform(EngineIntrinsics engineIntrinsics, object inputData) {
                    var results = engineIntrinsics.InvokeCommand.InvokeScript(
                        _transformScript,
                        true,   // Run in its own scope
                        System.Management.Automation.Runspaces.PipelineResultTypes.None,  // Just return as PSObject collection
                        null,
                        inputData
                    );
                    if (results.Count > 0) {
                        return results[0].ImmediateBaseObject;
                    }
                    return inputData;  // No transformation
                }
            }
        }
'@

    echo DateTime1, DateTime2 | ForEach-Object {
        Register-ArgumentCompleter -CommandName Test-DateTimeCompleter -ParameterName $_ -ScriptBlock { DateTimeConverter -wordToComplete $args[2] }
    }
}

Run this and try it out. Here’s an example of something to try to get you started (you should get tab completion at this point, so press Ctrl+Space if you’re not in the ISE):


Test-DateTimeConverter -DateTime1 1.

Example: Shadow PSBoundParameters

OK, this is a trimmed down example of one of my favorite uses for this. Some background: I’ve got a module that I use to help build commands that build dynamic SQL queries using a DSL. When you describe a column, you provide a type for it, e.g., [string], [datetime], [int], etc, and a command is created that has parameters of those types that, when specified, end up modifying the command’s internal WHERE clause. If you call Get-Command, you see their real types, but you can pass $null or a hashtable to specify advanced per-parameter options, e.g., @{Value='String'; Negate=$true} (think about how Select-Object’s -Property parameter usually takes strings, but you can provide calculated properties). Obviously, I can just make all of those commands take [object[]] types, but I prefer to let the help system and IntelliSense notify the user of what’s normally expected, and if they are aware of the advanced options, they can optionally use the other syntax.

While this isn’t the exact code I use, the concept is the same. What this will do is create a hashtable in the function’s scope to put the ‘real’ value provided into a $ShadowPSBoundParameters variable that can be accessed inside the function. It does this by using Get-Variable and Set-Variable to look into the parent scope (if you use engineIntrinsics to call InvokeScript() without creating a new scope, then the scope number will be different). NOTE: I make no claims to whether or not this is a good idea, but I think it’s a cool example showing what’s possible:

$ShadowParamMod = New-Module -Name ShadowParamMod {
    function Test-ShadowParams {
        [CmdletBinding()]
        param(
            [Test.TransformScript({
                 PopulateShadowParams -InputObject $_ -ParameterName Date -DefaultValue (Get-Date)
            })]
            [datetime] $Date,
            [Parameter(ValueFromPipeline)]
            [Test.TransformScript({
                PopulateShadowParams -InputObject $_ -ParameterName Strings -DefaultValue ''
            })]
            [string[]] $Strings,
            [Test.TransformScript({
                PopulateShadowParams -InputObject $_ -ParameterName Int -DefaultValue 0
            })]
            [int] $Int
        )

        process {

            'Inside Process {} block:'
            foreach ($Key in $PSBoundParameters.Keys) {
                [PSCustomObject] @{
                    Parameter = $Key
                    PSBoundParamValue = $PSBoundParameters[$Key]
                    ShadowPsBoundParamValue = $ShadowPsBoundParameters[$Key]
                }
            }
        }
    }
    Export-ModuleMember -Function Test-ShadowParams

    function PopulateShadowParams {
    <# NOTE: This is assuming you're using a C# transformation attribute, and you pass $true to the
        InvokeScript() argument for running code in a new scope. If not, you need to change the
         -ScopeDepth default parameter, or modify the function to look for some sort of anchor to search
        for in parent scopes ($PSCmdlet would probably work)     #>

        [CmdletBinding()]
        param(
            [Parameter(Mandatory, ValueFromPipeline)]
            [object] $InputObject,
            [Parameter(Mandatory)]
            [string] $ParameterName,
            [Parameter(Mandatory)]
            [object] $DefaultValue,
            # Function can actually walk the scope chain to figure this out. Scopes:
            #   0 - This function's scope
            #   1 - The attribute's scope (assuming engineIntrinsics is using new scope)
            #   2 - The function's scope that owns this attribute's parameter
            $ScopeDepth = 2
        )

        begin {
            $ShadowTableName = 'ShadowPsBoundParameters'
        }
        process {
            $ParamHashTable = try {
                Get-Variable -Scope $ScopeDepth -Name $ShadowTableName -ValueOnly -ErrorAction Stop
            }
            catch {
                @{}
            }

            $ParamHashTable[$ParameterName] = $InputObject

            Set-Variable -Name $ShadowTableName -Value $ParamHashTable -Scope $ScopeDepth

            # This is so normal parameter binding will still work. If the parameter is the proper type,
            # $PSBoundParameters will reflect the right value. If it's not of the proper type,
            # $PSBoundParameters will show a "default" value, but the $ShadowPsBoundParameters hashtable
            # will show the right value
            if ($InputObject -is $DefaultValue.GetType()) {
                $InputObject
            }
            else {
                $DefaultValue
            }
        }
    }

    Add-Type @'
        using System.Collections;    // Needed for IList
        using System.Management.Automation;
        using System.Collections.Generic;
        namespace Test {
            public sealed class TransformScriptAttribute : ArgumentTransformationAttribute {
                string _transformScript;
                public TransformScriptAttribute(string transformScript) {
                    _transformScript = string.Format(@"
                        # Assign $_ variable
                        $_ = $args[0]

                        # The return value of this needs to match the C# return type so no coercion happens
                        $FinalResult = New-Object System.Collections.ObjectModel.Collection[psobject]
                        $ScriptResult = {0}

                        # Add the result and output the collection
                        $FinalResult.Add((,$ScriptResult))
                        $FinalResult", transformScript);
                }

                public override object Transform(EngineIntrinsics engineIntrinsics, object inputData) {
                    var results = engineIntrinsics.InvokeCommand.InvokeScript(
                        _transformScript,
                        true,   // Run in its own scope
                        System.Management.Automation.Runspaces.PipelineResultTypes.None,  // Just return as PSObject collection
                        null,
                        inputData
                    );
                    if (results.Count > 0) {
                        return results[0].ImmediateBaseObject;
                    }
                    return inputData;  // No transformation
                }
            }
        }
'@
}

PS C:\> 1..2 | Test-ShadowParams -Date today -Int @{Key = 'Value'}

Inside Process {} block:

Parameter PSBoundParamValue    ShadowPsBoundParamValue
--------- -----------------    -----------------------
Date      3/29/2017 2:53:44 PM today                  
Int       0                    {Key}                  
Strings   {}                   1                      

Inside Process {} block:
Date      3/29/2017 2:53:44 PM today                  
Int       0                    {Key}                  
Strings   {}                   2                      

In that example, we passed a [string] to the parameter that expected [datetime], a [hashtable] to the one that wanted an [int], and an [int] to the one that wanted a [string]. It’s confusing, but notice how the $ShadowPsBoundParameters shows the real, un-coerced values passed into the function. We made it past parameter binding with the raw values! That really has a ton of uses, even if this example doesn’t make it that obvious. To really use it, you would want to put some restrictions on it and not let just anything through like it currently does.

I’ll end it there, but feel free to leave a comment if you have questions.

On Twitter a few days ago, Aaron Nelson, aka @SQLvariant, was trying to get a command parameter’s completion results to change based on the value of another parameter. It turns out, this is pretty simple with argument completers using PSv5+ (you can do this in PSv3+, but you’ll want to take on a dependency from the TabExpansionPlusPlus module).


The trick is using the fifth parameter that the PS engine passes into the parameter’s registered argument completer, which is usually called $fakeBoundParameter (that’s the parameter name I saw in TabExpansionPlusPlus, so that’s what I’ve always used…you can name it whatever you’d like in the param() block for your completer, though). Don’t worry if that doesn’t make sense; you can still work through the example code below, and if it still doesn’t make sense, there’s a link to a video at the end of the blog post that describes this in more detail.


To demonstrate what I’m talking about, let’s use a very simple example. Let’s assume we have a command, Get-Food, that has -FoodType and -FoodName parameters:
function Get-Food {
    param(
        [string] $FoodType,
        [string] $FoodName
    )

    "FoodName: ${FoodName}`nFoodType: ${FoodType}"
}
I didn’t say it was a useful command 🙂

Also assume that you’ve got a hash table that has some food types and food names in it, which are the source of the suggested parameter values:
$Foods = @{
    Fruit = echo Apple, Orange, Banana, Peach
    Vegetable = echo Asparagus, Carrot, Edamame, Broccoli, Spinach
    Protein = echo Beef, Pork, Chicken, Fish, Edamame
    Grain = echo Rice, Oatmeal, Pasta, Bread
}
The simple command would look a lot more polished if you could not only have -FoodType and -FoodName suggest values (that’s easy!), but if you could also have the suggested values change if you’ve already provided a parameter. So if -FoodType is ‘Fruit’, you’d want -FoodName to only suggest the fruits from the hash table. Alternatively, if -FoodName is ‘Apple’, -FoodType should only suggest ‘Fruit’.


Well, with argument completers, you can do that without too much work. To do it, we’ll use the Register-ArgumentCompleter command, which takes -ParameterName, -ScriptBlock, and, optionally, -CommandName parameters. After calling it, PowerShell will invoke the scriptblock each time a completion result is needed, e.g., when IntelliSense needs to display some information, or when a user presses [TAB] or [TAB] + [SPACE]. When it invokes the scriptblock, it will also pass some parameters to it, including a hash table that we’re going to name $fakeBoundParameter. That hash table will contain simple parameter values that have already been bound (I say simple because if you try to put an expression in the parameter value, $fakeBoundParameter won’t have that information since it could potentially cause side effects, and you don’t want parameter completion to potentially make changes on your system. It’ll have the info if you stick to simple strings, though). To see what I’m talking about, here’s how you’d register completers for the -FoodType and -FoodName parameters:
Register-ArgumentCompleter -ParameterName FoodType -ScriptBlock {
    param($commandName, $parameterName, $wordToComplete, $commandAst, $fakeBoundParameter)

    $FoodNameFilter = $fakeBoundParameter.FoodName

    $Foods.Keys | where { $_ -like "${wordToComplete}*" } | where {
        $Foods.$_ -like "${FoodNameFilter}*"
    } | ForEach-Object {
        New-Object System.Management.Automation.CompletionResult (
            $_,
            $_,
            'ParameterValue',
            $_
        )
    }
}

Register-ArgumentCompleter -ParameterName FoodName -ScriptBlock {
    param($commandName, $parameterName, $wordToComplete, $commandAst, $fakeBoundParameter)

    $TypeFilter = $fakeBoundParameter.FoodType

    $Foods.Keys | where { $_ -like "${TypeFilter}*" } | ForEach-Object { $Foods.$_ |
        where { $_ -like "${wordToComplete}*" } } |
        sort -Unique | ForEach-Object {
            New-Object System.Management.Automation.CompletionResult (
                $_,
                $_,
                'ParameterValue',
                $_
            )
        }
}
After running those, Get-Food‘s parameters should filter each other as described earlier:
 2017-01-17_21-49-52


Note that we didn’t actually need two separate scriptblocks when calling Register-ArgumentCompleter above. Notice that there are $commandName and $parameterName parameters that are passed when the scriptblock gets invoked (again, like any PS function, the parameter names are up to you…I’m just using the same param() block that TabExpansionPlusPlus used). You can use those to figure out what type of completion results to return. Then you can save the scriptblock, and just re-use it in the different calls to Register-ArgumentCompleter. Here’s what that might look like:
$Foods = @{
    Fruit = echo Apple, Orange, Banana, Peach
    Vegetable = echo Asparagus, Carrot, Edamame, Broccoli, Spinach
    Protein = echo Beef, Pork, Chicken, Fish, Edamame
    Grain = echo Rice, Oatmeal, Pasta, Bread
}

function Get-Food {
    param(
        [string] $FoodType,
        [string] $FoodName
    )

    "FoodName: ${FoodName}`nFoodType: ${FoodType}"
}

$GetFoodCompleter = {
    param($commandName, $parameterName, $wordToComplete, $commandAst, $fakeBoundParameter)
    $Foods.Keys.ForEach({
       $CurrKey = $_
       switch ($parameterName) {
           FoodName {
               $Source = $CurrKey
               $ReturnValue = $Foods[$CurrKey]
               $Filter = $fakeBoundParameter.FoodType
           }
           FoodType {
               $Source = $Foods[$CurrKey]
               $ReturnValue = $CurrKey
               $Filter = $fakeBoundParameter.FoodName
           }

           default { return }
       }
       if ($Source -like "${Filter}*") {
           $ReturnValue
       }
    }) | sort -Unique | where { $_ -like "${wordToComplete}*" } | ForEach-Object {
       [System.Management.Automation.CompletionResult]::new($_, $_, 'ParameterValue', $_)
    }
}
echo FoodType, FoodName | ForEach-Object {
    Register-ArgumentCompleter -CommandName Get-Food -ParameterName $_ -ScriptBlock $GetFoodCompleter
}
In this example it doesn’t really matter, but it makes sense in a lot of other scenarios to keep that kind of code together.


By the way, this barely scratches the surface of what you can do with argument completers. For more information, you can check out this presentation I gave at the PowerShell + DevOps Global Summit 2016 (The code samples from that presentation are on GitHub).
The other day, I got a comment on an old post asking about the status of using conditional ACEs (something I said in the post that I was planning to support in the PAC module). Over the past few nights, I played around with parsing and creating them. What I have so far is not even close to being finished, but I thought I might share it to see if there’s any interest in trying to do more with it.


First, what is a conditional ACE? It’s an ACE that is only effective in an ACL if a certain condition is met. For instance, maybe you want to allow Users to have Modify rights to a shared folder if the computer they’re using is a member of ‘Domain Controllers’ (that’s not a very good example, but you should be able to create that condition out of the box for a Server 2012 R2 or higher computer in a test domain without any extra work). Here’s what that would look like in the GUI and in SDDL form:
conditional_ace_gui


The conditions can get A LOT more specific (and complicated) than that, too. If you do some setup in your domain, you can actually have conditions check certain “claims” that apply to users, devices, and/or resources. Scenarios then become available where certain files (resources) can be dynamically classified (a separate technology) to only allow access from users/devices that meet certain conditions. Conditions like being in a certain department, or from a certain country (defined in Active Directory). I don’t want to spend too much time on explaining this because I would probably do such a bad job that it would turn you away from wanting to look into it any more.


Back to the simple example from the screenshot above: besides using the GUI and knowing how to write that SDDL by hand, I haven’t been able to find another way to create those conditions. The .NET Framework is able to give you the binary form of the condition, but that’s about it. The binary format is documented pretty well here, though, so I took that and messed around with some proof of concept code to parse and create the conditions. That code can be found in this GIST. Please note the following about it:
  • It’s meant to be used with Add-Type in PowerShell
  • I’m not really a developer, so that’s definitely not the prettiest and most efficient code. It’s going to change A LOT, too. Now that I have a better understanding of the binary format of the conditions (I hope), I’ll probably try to come up with a better design. If you have any suggestions, let me know.
  • There are still conditions this can’t handle. Non-Unicode encoded string tokens and numeric tokens aren’t supported yet. They’re coming, though…
  • The text form of the conditions is different that what the GUI shows. I’m playing around with making it closer to what you’d see with PowerShell, e.g., ‘-eq’ instead of ‘==’, ‘-and’ instead of ‘&&’, etc. I plan on having the text represenation being configurable so that you can have the GUI version, the SDDL version, or the PAC module’s version displayed.
  • Please only use it in a test environment.
Now that that’s out of the way, let’s go over some examples. First, how can you read this stuff? If you use the PAC module 4.0.82.20150706 or earlier, you’ll get something that looks like this:
pac_module_callback_ace
That’s not very helpful. The only indication that the conditional ACE is special is the ‘(CB)’ at the end of the AceType column (that stands for Callback). There is hope, though! If you’d like to read conditions right now, you can try something like this (PAC module is required)…
# Add C# code from here: https://gist.github.com/rohnedwards/b5e7ca34a062d765bf4a
Add-Type -Path C:\path\to\code\from\gist.cs

Get-PacAccessControlEntry c:\folder |
    Add-Member -MemberType ScriptProperty -Name Condition -Value {
        $Ace = $this.GetBaseAceObject()
        if ($Ace.IsCallback) {
            [Testing.ConditionalAceCondition]::GetConditionalAceCondition($Ace.GetOpaque())
        }
    } -PassThru |
    tee -var Aces |
    select AceType, Principal, AccessMask, InheritedFrom, AppliesTo, Condition |
    Out-GridView
… and get someting that looks like this:
get-ace_with_conditions


What if you want to add a conditional ACE? That’s actually pretty nasty right now. Besides being forced to create your own condition and ACE using C# classes, I think you also have to add your new ACE with the RawSecurityDescriptor class, which means you are responsible for the position in the DACL where the ACE ends up. It can be done, though: (The PAC module isn’t needed for this; you do need the code from the GIST above, though)


First, let’s create the condition from the simple example above:
Add-Type -Path C:\path\to\code\from\gist.cs

# Create an operator token:
$Operator = New-Object Testing.ConditionalAceOperatorToken "Device_member_Of"

# Device_member_Of is a unary operator, so create a unary condition with
# the $Operator
$Condition = New-Object Testing.ConditionalAceUnaryCondition $Operator

# This unary condition needs an array of SID tokens. In our example, we have a single
# SID we're using, so let's look that up first:
$DcGroupSid = ([System.Security.Principal.NTAccount] "Domain Controllers").Translate([System.Security.Principal.SecurityIdentifier])

# Then create a composite token, which is going to contain the list of SID tokens:
$CompositeToken = New-Object Testing.ConditionalAceCompositeToken

# Then add a SID token to the composite token:
$CompositeToken.Tokens.Add((New-Object Testing.ConditionalAceSecurityIdentifierToken $DcGroupSid))

# Finally, assign the operand
$Condition.Operand = New-Object Testing.ConditionalAceConditionalLiteralOperand $CompositeToken
Next, let’s create an ACE with that condition:
$NewAce = New-Object System.Security.AccessControl.CommonAce (
    "ContainerInherit, ObjectInherit", # ACE flags
    [System.Security.AccessControl.AceQualifier]::AccessAllowed,
    [System.Security.AccessControl.FileSystemRights]::Modify,
    ([ROE.PowerShellAccessControl.PacPrincipal] "Users").SecurityIdentifier,
    $true,
    $Condition.GetApplicationData()
)
And, finally, let’s add the ACE to the DACL:
$Path = "C:\folder"
$Acl = Get-Acl $Path
$RawSD = New-Object System.Security.AccessControl.RawSecurityDescriptor $Acl.Sddl

# Figure out where the ACE should go (this is to preserve canonical ordering; I
# didn't think much about this, so this might not always work):
for ($i = 0; $i -lt $RawSD.DiscretionaryAcl.Count; $i++) {
    $CurrentAce = $RawSD.DiscretionaryAcl[$i]
    if ($CurrentAce.IsInherited -or $CurrentAce.AceQualifier.ToString() -eq "AccessAllowed") { break }
}
$RawSD.DiscretionaryAcl.InsertAce($i, $NewAce)

# Save to SD and write it back to folder
$Acl.SetSecurityDescriptorSddlForm($RawSD.GetSddlForm("All"))
(Get-Item $Path).SetAccessControl($Acl)
And we’re done! Don’t worry, this shouldn’t always be this hard. Some cmdlets to create conditions will help a lot. Also, the PAC module’s New-PacAccessControlEntry, Add-PacAccessControlEntry, and Remove-PacAccessControlEntry commands should know how to add these ACEs one day.


So, is this useful to anyone, and should I spend time trying to get the PAC module to handle this? Are there any scenarios you have that you’d like to see an example for? Please leave a comment and/or contact me on Twitter (@magicrohn) if so.

There’s a new version of the PAC 4.0 Preview available on the TechNet Script Repository. There’s still no official documentation in the new version, so I’ll briefly mention some of the changes below. If you missed it, the first post on the 4.0 preview is here:

Modification Cmdlets

The following cmdlets are now available:

  • New-AccessControlEntry
  • Add-AccessControlEntry
  • Remove-AccessControlEntry
  • Enable-AclInheritance
  • Disable-AclInheritance
  • Set-Owner
  • Set-SecurityDescriptor

Like in previous versions, these commands can be used to work with native .NET security descriptor objects (output from Get-Acl), PAC security descriptor objects (output from Get-SecurityDescriptor), or directly with a whole bunch of objects. Here are some examples of what I’m talking about:

Working with .NET Security Descriptor Objects

You’re probably familiar with using the native PowerShell and .NET commands to work with security descriptors. You do something like this:

$Acl = Get-Acl C:\powershell
$Ace = New-Object System.Security.AccessControl.FileSystemAccessRule(
 "Everyone",
 "Write",
 "ContainerInherit, ObjectInherit",
 "None",
 "Allow"
)
$Acl.AddAccessRule($Ace)
$Acl | Set-Acl

That’s a lot of work to add a single Allow ACE giving Everyone Write access. You can use the PAC module to shorten that code to this:


$Acl = Get-Acl C:\powershell
$Ace = New-AccessControlEntry -Principal Everyone -FolderRights Write
$Acl.AddAccessRule($Ace)
$Acl | Set-Acl


You can also just cut out the New-AccessControlEntry call completely, which would shorten the snippet to this:


$Acl = Get-Acl C:\powershell
$Acl | Add-AccessControlEntry -Principal Everyone -FolderRights Write
$Acl | Set-Acl


And finally, one more way to shorten that:


Get-Acl C:\powershell | Add-AccessControlEntry -Principal Everyone -FolderRights Write -Apply

When you use -Apply like that, the module will actually call Set-SecurityDescriptor, so you’re not just using native PowerShell and .NET commands at that point.

Working with PAC Security Descriptor Objects

This actually looks just like working with the .NET security descriptor objects, except you use Get-SecurityDescriptor instead of Get-Acl, and Set-SecurityDescriptor instead of Set-Acl.

Working With Objects Directly

You don’t even need to use Get-Acl/Set-Acl or Get-SecurityDescriptor/Set-SecurityDescriptor. There are a ton of .NET and WMI instances that the module knows how to work with. These commands would be valid:


# This defaults to enabling inheritance on the DACL, but the SACL can be controlled, too
dir C:\powershell -Recurse |
Enable-AclInheritance -PassThru |
Remove-AccessControlEntry -RemoveAllAccessEntries -Apply

# -Apply isn't necessary here because the input object isn't a security descriptor. -Force
# would stop it from prompting you before saving the security descriptor.
Get-Service bits | Add-AccessControlEntry -Principal Users -ServiceRights Start, Stop

Get-SmbShare share | Add-AccessControlEntry -Principal Everyone -AccessMask ([ROE.PowerShellAccessControl.Enums.ShareRights]::FullControl)

PacSDOption Common Parameter

Most of the commands in the module have a parameter named -PacSDOption. That’s how you control things like recursing through child items (where supported), getting the SACL, bypassing the ACL check (the -BypassAclCheck parameter from the last post doesn’t exist as a direct cmdlet parameter anymore). The parameter’s input is from the New-PacCommandOption cmdlet. Here’s an example:


# Get the DACL and SACL entries for C:\powershell, even if you don't have permission to view them
Get-AccessControlEntry C:\powershell -PacSDOption (New-PacCommandOption -BypassAclCheck -Audit)

# Get the DACL and SACL entries for C:\powershell and any child folders (even if long paths are there):
Get-AccessControlEntry C:\powershell -PacSDOption (New-PacCommandOption -Recurse -Directory)

Formatting

The default formatting of a security descriptor now shows both the DACL and the SACL:

new_getsecuritydescriptor_format

The module will also check for the existence of a hash table named $PacOptions, and change how ACEs are displayed depending on its value. For now, there’s a single display option ‘DontAbbreviateAppliesTo’ that let’s you control how the AppliesTo column is displayed on ACEs. Here’s an example of how to create the hash table and change the AppliesTo setting:

dontabbreviateappliesto

Remember that this is still a preview version, so you’ll probably come across some things that don’t work the way they’re supposed to. If you find a problem, have a question about how to do something, or have a suggestion, please either post a comment below or send me an e-mail (magicrohn -at- outlook.com). Since there’s no documentation yet, I really don’t have a problem answering any questions.

Have you ever tried to use PowerShell (or .NET) to mess with file or folder permissions and wondered what the ‘Synchronize’ right means? It pops up all over the place, like on existing ACEs:

what_does_synchronize_mean_example
And on new ACEs that you create (even if you don’t include it):

synchronize_2

If you try to check permissions using the ACL Editor, you won’t see it anywhere. Here’s the ACE for ‘Users’ from the ‘C:\powershell’ folder shown in the first screenshot above:

synchronize_3_acl_editor

So, what is this mysterious right, and why does PowerShell/.NET insist on showing it everywhere? Let’s start with the definition from MSDN:

The right to use the object for synchronization. This enables a thread to wait until the object is in the signaled state. Some object types do not support this access right.

The first time I read that, I didn’t think it sounded all that important. It turns out, though, that it’s critical for working with files and folders.

Before I explain a little bit more about why that right shows up, let’s briefly cover what makes up an access control entry’s access mask. It’s a 32-bit integer, which means that, theoretically, there are 32 different rights that can be controlled (32 bits means 32 different on/off switches). In practice, you don’t get that many rights, though. No matter what type of object you’re working with (file, folder, registry key, printer, service, AD object, etc), those 32-bits are broken down like this:

  • Bits 0-15 are used for object specific rights. These rights differ between object types, e.g., bit 1 for a file means ‘CreateFiles’, for a registry key means ‘SetValue’, and for an AD object means ‘DeleteChild’.
  • Bits 16-23 are used for “Standard access rights”. These rights are shared among the different types of securable objects, e.g., bit 16 corresponds to the right to delete the object, and it means the same thing for files, folders, registry keys, etc. As far as I know, only bits 16-20 in this range do anything.
  • Bit 24 controls access to the SACL.
  • Bits 25-27 are reserved and not currently used.
  • Bits 28-31 are “Generic access rights”. They are a shorthand way of specifying four common access masks: read, write, execute, and all (full control). These bits are translated into a combination of object specific and standard access rights, and the translation differs depending on the type of object the ACE belongs to.

The ‘Synchronize’ right is controlled by bit 20, so it’s one of the standard access rights:

PS> [math]::Log([System.Security.AccessControl.FileSystemRights]::Synchronize, 2)
20

If you manage to remove the right (or if you explicitly deny it), bad things will happen. For folders, you won’t be able to see child items. For files, you won’t be able to view the contents. It turns out some very important Win32 APIs require that right to be granted, at least for file and folder objects. You get a hint of it from this MSDN page:

Note that you cannot use an access-denied ACE to deny only GENERIC_READ or only GENERIC_WRITE access to a file. This is because for file objects, the generic mappings for both GENERIC_READ or GENERIC_WRITE include the SYNCHRONIZE access right. If an ACE denies GENERIC_WRITE access to a trustee, and the trustee requests GENERIC_READ access, the request will fail because the request implicitly includes SYNCHRONIZE access which is implicitly denied by the ACE, and vice versa. Instead of using access-denied ACEs, use access-allowed ACEs to explicitly allow the permitted access rights.

I couldn’t do a good job of translating the actual definition of ‘Synchronize’ earlier, but I think I can translate this paragraph. It’s saying that you can’t create an access denied ACE for just GENERIC_READ or just GENERIC_WRITE as they are defined, because each of those sets of rights include ‘Synchronize’, and you’d effectively be denying both sets of rights. GENERIC_READ (bit 31) and GENERIC_WRITE (bit 30) are two of the four “Generic access rights” mentioned above. When they’re translated/mapped to their object-specific rights, they make up a combination of bits 0-20 of the access mask (object specific and standard rights).

Once translated, GENERIC_READ is very similar to [FileSystemRights]::Read, and GENERIC_WRITE is very similar to [FileSystemRights]::Write. From the same MSDN page, here’s a list of the object specific and standard rights that make up the generic rights (the [FileSystemRights] equivalents are listed in parenthesis):

  • GENERIC_READ
    • FILE_READ_ATTRIBUTES (ReadAttributes)
    • FILE_READ_DATA (ReadData)
    • FILE_READ_EA (ReadExtendedAttributes)
    • STANDARD_RIGHTS_READ (ReadPermissions)
    • SYNCHRONIZE (Synchronize)
  • GENERIC_WRITE
    • FILE_APPEND_DATA (AppendData)
    • FILE_WRITE_ATTRIBUTES (WriteAttributes)
    • FILE_WRITE_DATA (WriteData)
    • FILE_WRITE_EA (WriteExtendedAttributes)
    • STANDARD_RIGHTS_WRITE (ReadPermissions)
    • SYNCHRONIZE (Synchronize)

The [FileSystemRights] enumeration has values for Read and Write that almost match what is defined above. Since PowerShell coerces strings into enumerations, and enumerations will attempt to show you combined flags where possible, let’s take a look at how those rights are seen when they’re cast as a FileSystemRights enumeration:

synchronize_4_generic_to_filesystemrights

Hopefully that makes sense. It’s showing that GENERIC_READ in [FileSystemRights] translates to ‘Read, Synchronize’, which means that GENERIC_READ is not the same as [FileSystemRights]::Read since ‘Read’ doesn’t include ‘Synchronize’. GENERIC_WRITE and [FileSystemRights]::Write are almost the same, except [FileSystemRights]::Write is also missing ‘ReadPermissions’ in addition to ‘Synchronize’.

So, why don’t the generic rights translate to the same numeric values for [FileSystemRights]? It goes back to the warning from the MSDN page above: if you want to deny ‘Read’ or ‘Write’ only, you have to remove the ‘Synchronize’ right first. The ACL editor does this, and it doesn’t give you any control over the ‘Synchronize’ right: if you create a new ACE it will determine whether or not the right is added, and it never shows it to you. The creators of the file/folder access control .NET classes didn’t get that luxury. Each ACE has a numeric access mask, and that access mask needs to be translated with a flags enumeration. If the ‘Synchronize’ bit is set, then the flags enumeration string is going to show it, and vice versa. So, they did the next best thing: they pulled ‘Synchronize’ from the combined ‘Read’ and ‘Write’ rights in the [FileSystemRights] enumeration, and made sure that creating a new allow ACE or audit rule automatically adds the ‘Synchronize’ right, and creating a new deny ACE removes it. If an application wants to hide the ‘Synchronize’ right from the end user, that’s fine, but the underlying .NET object will show it if it’s present.

I hope that makes sense and clears that up. If not, please leave a comment where something needs to be explained a little better, and I’ll try to expand on it some more.

Happy New Year! It’s been a while since I’ve posted anything on here, but I’ve still been working on the module. I posted a preview of version 4.0 of my access control module on the TechNet Script Repository. It only has three commands right now and can only view security descriptors, but I think it’s a huge improvement over version 3.0. Some of the biggest changes are listed below:

Speed

The most noticeable difference between versions 3 and 4 has to be the speed improvement. Version 3.0 added Active Directory support, and that extra functionality really highlighted just how slow the module had become. Version 4.0 is compiled C# code (it’s actually my first C# project). Check out the speed difference:

pac4_preview_timing

I cut the command off, but it was just calling Get-SecurityDescriptor and Get-Acl against ‘C:\Windows’ 20 times and using Measure-Command and Measure-Object to get the average time. As you can see, Get-SecurityDescriptor is as fast (and sometimes faster) than the native Get-Acl cmdlet (this was by no means a rigorous test, so I won’t say it’s always faster than the native cmdlet).

Better Long Path Support/Inline Path Options

Version 3.0 supported using paths longer than 255 characters, but just barely. You either had to know the full path or the depth in a folder structure of the file or folder you were after. For example, you could pass ‘c:\longpathliveshere\*\*\*’ as a path to the functions, and it would resolve to any files or folders that were 3 levels deeper than ‘C:\longpathliveshere’, no matter how long the resulting paths were (this worked by proxying the Resolve-Path cmdlet inside the module scope and using the Microsoft.Experimental.IO.LongPathDirectory class to handle any paths that were too long). You couldn’t use it to recurse through a folder that had paths that were too long, though.

Version 4.0 will take care of that, even though I’m not 100% sure how yet. Right now, there’s a cmdlet called Get-PacPathInfo that takes any object and attempts to get the necessary information from it to get a security descriptor. The cmdlet has -Recurse, -Directory, and -File switches that allow you to, where appropriate, recurse through a structure and filter just on files and/or folders. So if you feed it a service object and use any of those switches, they’re going to be ignored. -Recurse will work on registry key and folder objects, though.

You can take the output from that cmdlet and pipe it into Get-SecurityDescriptor or Get-AccessControlEntry. I’m not sure that I’ll leave that cmdlet in the module, though, because that same functionality can be achieved through inline path options. Right now, the syntax for those is very similar to inline regex options:

pac4_preview_inline_path_options

Right now there are four inline options: l for literal path, r for recurse, d for directory, and f for file.

Display Options

This is something else that’s definitely not in its final form. I’ve been playing around with displaying ACEs differently on the fly. If you use Get-AccessControlEntry, you’ll find a -DisplayOptions parameter that gives you lots of different switches to try that will change how the ACEs are shown. Try each of these yourself and see if you can spot the differences:


PS> Get-AccessControlEntry C:\Windows
PS> Get-AccessControlEntry C:\Windows -DisplayOptions DontMergeAces
PS> Get-AccessControlEntry C:\Windows -DisplayOptions DontMergeAces, DontMapGenericRights
PS> Get-AccessControlEntry C:\Windows -DisplayOptions ShowDetailedRights

Backup Mode

Have you ever encountered a file, folder, or registry key that you didn’t have access to as an administrator? If you wanted to view/use the object, or even to view the DACL or SACL, you had to take ownership of the object first. Well, now you can view the security descriptor’s contents without having to take ownership (assuming you have the SeBackupPrivilege assigned):

pac4_preview_bypassaclcheck

You can try it yourself. It works on files, folders, and registry keys right now. If you don’t have a file or folder that is denying you access as an administrator lying around, you can do the following:

1. Create a file, folder, or registry key
2. Make sure it has some ACEs, either inherited or explicitly defined
3. Add an ACE that denies ‘Full Control’ to your user
4. Make sure to set another user as the owner

To test, make sure you can’t open the folder. Then try Get-SecurityDescriptor with the -BypassAclCheck switch and take a look.

Oh, here’s a semi-unrelated trick that should work with the new path system if you’ve got access to a remote computer (I’m already planning to one day put this into a PS provider that also includes the ability to filter on value names and data, unless someone else beats me to it):


PS> Get-SecurityDescriptor \\computername\hklm:\software\*
Friendly AppliesTo

One area where I really like using my module over the native .NET access control classes is showing what exactly an ACE applies to. For non-containers, i.e., files, services, printers, etc, that’s easy since it only applies to the object itself. Folders, though, can have ACEs that apply to themselves, their sub folders, and their files. Registry keys and WMI namespaces can have ACEs that apply to themselves and/or any child containers. We’re not going to cover AD objects right now, but they have different ways that ACEs can be applied. The .NET classes relay this information through the InheritanceFlags and PropagationFlags properties of an ACE. The PAC module relays it through the AppliesTo property (before version 4.0, there was also an OnlyAppliesHere property, but that’s now contained in AppliesTo as well). When you’re looking at the default table formatting of an object’s ACEs, AppliesTo is shown in an abbreviated form:

pac4_preview_short_appliesto
In version 3.0, the list view would spell those letters out in the generic Object, ChildContainer, ChildObjects form. Version 4.0 actually shows you object specific names, though. Here’s Get-AccessControlEntry’s output being sent to Select-Object showing the short and long forms of the AppliesTo property in table form:

pac4_preview_friendly_appliesto

If you like, you can try it out on a registry key and see what it looks like.

I personally like the abbreviated view better in the table format, but others may like the longer version in that view. This is an area where I’m still trying to figure out how I’d like to give the user the ability to change the view, either temporarily or permanently.

There are lots of other small things, too. For instance, try using Export-Csv with both version 3.0 and version 4.0. The new version is much cleaner because it’s using a custom class instead of adding properties to an existing .NET class.

Obviously this is still very early and is missing a ton of functionality: there are no modification commands, DSC, or effective access (which was another one of my favorite 3.0 features). Anything you see is subject to change (I can guarantee that the backing enumeration for the -Sections parameter on Get-SecurityDescriptor is going to have some changes, and the -Audit switch will somehow make a return to that command, too).  And the source code isn’t posted yet (you can decompile it, though). All of that is coming. The effective access stuff is pretty much the only part I haven’t started working on in C# yet, but all of the hard work was done almost a year ago when working on version 3.0. I can’t wait to see the speed improvements in that area.

In the meantime, please try this out and let me know what you think. If you find any bugs, or if you have any suggestions for ways to make it better, please let me know. You can post a comment here, on the Q&A page of the module’s repository page, or send me an email at magicrohn -at- outlook.com

Over the summer, the PowerShell Access Control module got some DSC resources to help manage security descriptors for for some of the supported object types. I’ve tested them a little bit, but I haven’t had enough time to really make sure they work as well as I’d like. Also, they’re still missing some functionality, and there are still some design decisions that haven’t been finalized. When I saw that the PowerShell Summit’s DSC Hackathon has a scenario for creating a resource that handles file and folder ACLs, I thought this would be a good time to show what’s currently in the module. I’m hoping that other people will test the resources and help me figure out what’s missing or what needs to be changed (I already know that the code needs to be cleaned up and the Get-TargetResource functions need some work).

If you download the latest version from the repository, you’ll see that the module includes three resources: cAccessControlEntry, cSecurityDescriptorSddl, and cSecurityDescriptor. Each is described in a little more detail below.

NOTE: The types of securable objects that these work against is currently limited to Files, Folders, Registry Keys, WMI Namespaces, and Services. The only reason the other object types that the module supports won’t work is that I haven’t really documented the path format. I mention that a little bit below when describing each of the properties for the cAccessControlEntry resource. Look for more supported objects in a future release, especially Active Directory objects.

cAccessControlEntry

The first of the three resources provides the least amount of control over a security descriptor. cAccessControlEntry provides a way to check that a DACL contains (or doesn’t contain) certain access or that a SACL contains (or doesn’t contain) entries that will generate certain audits. Here are a few scenarios that you can use it for:

  • Make sure Users group has Modify rights to a folder, but not any of its sub folders and files
  • Make sure Users group doesn’t have Delete right to a file or folder
  • Make sure Users group is explicitly denied Delete right on a file or folder
  • Make sure Users will generate an audit when any failed access attempt is performed
  • Make sure Users have Start and Stop rights to a specific service

The resource has the following properties:

  • AceType (Required) – The type of ACE; options are AccessAllowed, AccessDenied, and SystemAudit
  • ObjectType (Required) – The type of the securable object. Currently limited to File, Directory, RegistryKey, Service, and WmiNamespace. The only difference between File and Directory is the default AppliesTo value (if you don’t specify AppliesTo, a File object will use Object and a Directory object will use Object, ChildContainers, ChildObjects)
  • Path (Required) – The path to the securable object. This is obvious for files, folders, and registry keys, but not necessarily for other object types. You can get the path to your securable object by using Get-SecurityDescriptor and copying the SdPath property.
  • Principal (Required) – User/group/etc that is being granted/denied access or audited.
  • AccessMask (Required unless Ensure is set to Absent) – An integer that specifies the access to grant/deny/audit.
  • Ensure (Optional) – Controls whether an ACE for the specified properties should be present or absent from the DACL/SACL.
  • AppliesTo (Optional) – This is only used when dealing with a container object (an object that can have children, like folders, registry keys, WMI namespaces). It allows you to control where the ACE will apply. If you don’t use it, the default is used, which may be different depending on the ObjectType.
  • OnlyApplyToThisContainer (Optional) – Used like AppliesTo. This sets the NoPropagateInherit propagation flag, which means that children of the object that Path points to will inherit the ACE described, but their children (the object’s grandchildren) will not.
  • Specific (Optional) – Makes sure that the ACE described by the supplied properties is exactly matched. For example, if you want to make sure Users have Read access, and they already have Modify, testing for the desired access would normally pass since Modify contains Read. If you supply a value of $true for this property, though, the test would fail since Modify is not the same as Read. If this was set to $true in the previous example, the Modify ACE would be removed and a new Read ACE would be added.
  • AuditSuccess and AuditFailure (Only valid when AceType is SystemAudit) – At least one of these properties must be set to $true when describing an audit ACE.

The resource will currently only check against explicitly defined ACE entries. That means that inherited entries are completely ignored. If you’re ensuring access is granted or denied, that shouldn’t be a problem, but it could be a problem if you want to make sure access isn’t granted (Ensure = Absent). Let me demonstrate with a few examples:

Example 1: Make sure Users group has Modify rights to c:\powershell\dsc\test folder and its subfolders (but not files)

First, lets look at the DACL before making any changes:

dsc_cAccessControlEntry_1

Notice that Users already has Modify rights, but they’re being inherited from the parent folder. If we run the following DSC configuration, a new explicit ACE will be added since the DSC resource ignores inherited ACEs:

configuration DscAceTest {
    param(
        [string[]] $ComputerName = "localhost"
    )

    Import-DscResource -Module PowerShellAccessControl

    cAccessControlEntry UsersModifyFolder {
        AceType = "AccessAllowed"
        ObjectType = "Directory"
        Path = "C:\powershell\dsc\test"
        Principal = "Users"
        AccessMask = [System.Security.AccessControl.FileSystemRights]::Modify
        AppliesTo = "Object, ChildContainers"  # Apply to the folder and subfolders only
    }
}

dsc_cAccessControlEntry_3

If you were to change the cAccessControlEntry node shown above to include Ensure = ‘Absent’, the DACL would go back to what it looked like in the first screenshot. The inherited ACE would still be there, though, and the LCM would tell you that the configuration was successfully applied (and Test-DscConfiguration would return $true).

Example 2: Make sure Users don’t have Delete rights on the folder itself (but don’t worry about sub folders or files)

For this example, we’ll actually pick up where the last one left off, so see the last screenshot. Users have an ACE that is not inherited that grants Modify rights to the folder and subfolders (Object and ChildContainers). Lets assume that we didn’t set that up with DSC (that just so happens to be what the folder’s DACL currently looks like), and we just want to make sure that Users can’t delete the folder. To do that, you could run the following configuration:

configuration DscAceTest {
    param(
        [string[]] $ComputerName = "localhost"
    )

    Import-DscResource -Module PowerShellAccessControl

    cAccessControlEntry UsersCantDeleteFolder {
        AceType = "AccessAllowed"
        ObjectType = "Directory"
        Path = "C:\powershell\dsc\test"
        Principal = "Users"
        AccessMask = [System.Security.AccessControl.FileSystemRights]::Delete
        AppliesTo = "Object"  # Only apply to the folder
        Ensure = "Absent"     # Make sure permission isn't granted
    }
}

And you’d get a DACL that looks like this:dsc_cAccessControlEntry_5

What happened there? When the configuration was run, the LCM saw that it needed to make some changes because Users had Delete permission to the folder object. When the configuration was applied, only Delete permissions were removed from the folder itself, so the single ACE needed to be split into two ACEs: one that gives Modify minus Delete to the folder and subfolders, and one that gives Delete to just the subfolders. In the end, the LCM did exactly what it was asked, which was ensure that Delete permission wasn’t granted to the folder itself.

Remember that there is still an inherited ACE that grants that permission to the Users group. To get around this, you’ll need to use the cSecurityDescriptorSddl or cSecurityDescriptor resources instead since they have the ability to control DACL and SACL inheritance.

cSecurityDescriptorSddl

This one is really simple to explain, but, since it uses SDDL, its kind of tough to use. You get to control a lot more with this resource than with cAccessControlEntry because this lets you control the entire security descriptor. There are only three properties, and they are all required:

  • Path – This is the same as the Path property for cAccessControlEntry above.
  • ObjectType – This is the same as the ObjectType property for cAccessControlEntry above.
  • Sddl – This is a string representation of the security descriptor. The neat thing about this is that you can include any combination of the four security descriptor sections: Owner, Group, DACL, or SACL. Any section that is missing from the SDDL string shouldn’t be tested or touched.

To use it, I recommend configuring an object the way you want it, and running the following to get the SDDL string:

# This is if you want the entire SD:
(Get-SecurityDescriptor C:\powershell\dsc\DscAceTest).Sddl

# If you only want certain sections, do this (the latest builds of the PAC
# module have this method exposed to the SD object itself, so this format 
# won't work in a future version without a slight modification)
# Valid arguments for the GetSddlForm() method are All, Owner, Group, Access,
# and Audit:
$SD = Get-SecurityDescriptor C:\powershell\dsc\DscAceTest
$SD.SecurityDescriptor.GetSddlForm("Owner, Access")

Let’s continue from the example above. We can’t control the ACEs that are being inherited (unless we modify the parent object), but we can tell the folder to disable DACL inheritance. The following configuration contains an SDDL string that only modifies the DACL (so the Owner, Group, and SACL aren’t touched), disables DACL inheritance, and specifies each of the ACEs that were being inherited as explicit entries instead:

configuration DscDaclTest {
    param(
        [string[]] $ComputerName = "localhost"
    )

    Import-DscResource -Module PowerShellAccessControl

    cSecurityDescriptorSddl TestDacl {
        ObjectType = "Directory"
        Path = "C:\powershell\dsc\test"
        Sddl = "D:PAI(A;OICIIO;SDGXGWGR;;;AU)(A;;0x1301bf;;;AU)(A;OICI;FA;;;SY)(A;OICI;FA;;;BA)(A;CI;0x1201bf;;;BU)(A;CIIO;SD;;;BU)"
    }
}

After running that, the folder’s DACL looked like this for me:

dsc_cAccessControlEntry_6

Using that resource means that you can force that DACL to look like it does above every single time the DSC configuration is run. cAccessControlEntry only cared about the specific ACE properties supplied to it, and it didn’t care about the rest of the ACL. This resource, when the DACL or SACL sections are specified, controls the whole ACL. That’s pretty powerful, but it’s really, really hard to read. Thankfully, the last resource fixes the readability part (I hope).

cSecurityDescriptor

This resource does the exact same thing as cSecurityDescriptorSddl, except it doesn’t use SDDL. It has the following properties:

  • Path – This is the same as the Path property for cAccessControlEntry above.
  • ObjectType – This is the same as the ObjectType property for cAccessControlEntry above.
  • Owner – A string specifying who/what the owner should be set to
  • Group – A string specifying who/what the group should be set to
  • Access – A CSV that specifies the explicit DACL ACEs that should be present. If the explicit ACEs don’t match this list, all explicit ACEs will be removed, and ACEs specified here will be applied. The headers are parameter names that would be passed to the New-AccessControlEntry function.
  • AccessInheritance – Controls DACL inheritance. Valid values are Enabled and Disabled.
  • Audit – A CSV that specifies the explicit SACL ACEs that should be present. If the explicit ACEs don’t match this list, all explicit ACEs will be removed, and ACEs specified here will be applied. The headers are parameter names that would be passed to the New-AccessControlEntry function.
  • AuditInheritance – Controls SACL inheritance. Valid values are Enabled and Disabled.

The following configuration does the same thing as the cSecurityDescriptorSddl example above:

configuration DscDaclTest {
    param(
        [string[]] $ComputerName = "localhost"
    )

    Import-DscResource -Module PowerShellAccessControl

        cSecurityDescriptor TestFolderSdDacl {
            Path = "c:\powershell\dsc\test"
            ObjectType = "Directory"
            AccessInheritance = "Disabled"
            Access = @"
                AceType,Principal,FolderRights,AppliesTo
                AccessAllowed,Authenticated Users,"Modify,Synchronize"
                AccessAllowed,SYSTEM,FullControl
                AccessAllowed,Administrators,FullControl
                AccessAllowed,Users,"Write,ReadAndExecute,Synchronize","Object,ChildContainers"
                AccessAllowed,Users,Delete,ChildContainers
"@
        }
}

If you download the module, there are more examples of each of the resources in the \examples\dsc\ folder. Please grab the latest version and give these resources a try. If you have any questions, suggestions, or criticisms, please leave a comment below and let me know. Thanks!

I’ve had a beta version of the PAC module available on Script Center repository for quite a while now. It adds several new features, including the following:

  • Active Directory objects are supported
  • Desired State Configurations (DSC) resources available to automate access control settings (see about_PowerShellAccessControl_DscResources)
  • Supports filenames longer than 260 characters (PSv3 or higher)
  • Shows inheritance source for file, folder, registry key, and Active Directory objects (PSv3 or higher)

The documentation isn’t finished, and there are still a few bugs that I’m aware of that need to be fixed. I’ve been using it in its current form for a while, though, so I feel that it’s pretty stable. Give it a shot and let me know if you have any issues and/or questions (you can post here or on the Q&A section on the repository page.

The biggest problem I have with it is the speed (especially when working with AD objects). I’ve been playing around with moving some of it to C#, and I’ve noticed an amazing speed improvement. At some point in the future, the module will have at least some C#. I may one day make the entire module a compiled module (the source code will always be included).

Other features that will come in the future:

  • Central Access Policies (view/set assigned CAPs for files and folders and view central access rules associated with the CAP)
  • Conditional/Callback ACEs will show conditions (very similar to ACL Editor)
  • File/folder dynamic access control tags will be viewable (and one day settable)
  • Get-EffectiveAccess will show limiting CARs when a CAP is assigned (right now, CAPs should be taken into account, but it won’t show which CAR is limiting access)
  • Get-EffectiveAccess will allow you to add group/device claims